Deployment of YOLOv8 on ONNX Runtime (C++)
In a certain Ubuntu desktop application project, a visual object detection module is required. This desktop application is implemented in C++ based on QT5. Considering both resource utilization and subsequent packaging, distribution, and deployment, ONNX Runtime is chosen for the deployment of the deep learning models.
The YOLO series are extremely well known target detection models, and I used to use the YOLOv5-tiny for a UAV project. So far (2024.5.29), it has been rolled out to v10. This time, I chose the more stable YOLOv8 for deployment.
Use of ONNX Runtime
ONNX(Open Neural Network Exchange)is an open-source artificial intelligence ecosystem of technology companies and research organizations that establish open standards for representing machine learning algorithms and software tools to promote innovation and collaboration in the AI sector (wiki)
In short, the onnx format basically supports interconversion with models in various formats (PyTorch, MXNet, etc.) and is easy to use for deployment. There are many concise tutorials on ONNX Runtime, so here is a brief list:
- ONNX Runtime Official Documentation: as a dictionary.
- netron: A tool to view the network structure, very convenient
Install
Refer to the official documentation to complete.
Integrate it into a CMake project
include_directories(usr/local/include/onnxruntime)
target_link_libraries(DeskPet
    ${PROJECT_NAME}
    Qt5::Widgets
    Qt5::Gui
    ${OpenCV_LIBS}
    /usr/local/lib/libonnxruntime.so
    )
The purpose of include_directories is to include the header files. target_link_libraries links the source file to the executable project DeskPet.
Then, we should include the head file what we need.
#include<onnxruntime/core/session/onnxruntime_cxx_api.h>
This header file contains all the necessary declarations and definitions needed for model inference in C++ using the ONNX Runtime, such as the core env, session, Value, etc., which will be covered later here. Of course if you want to configure some advanced options for cuda, you can refer to cuda_provider_factory.h, my knowledge stack is not yet at such a level, so I won’t delve into it here.
Initialization and Model Loading
I encapsulate a class named eyeAnalyzer,Because YOLOv5 is a single-input, single-output node, here I only capture the initialization related to single-model, single-input, single-output of ONNX Runtime. Nodes with multiple inputs and multiple outputs can be loaded through session.
class eyeAnalyzer{
public:
    eyeAnalyzer(const std::string& detect_model_path, const int mode = 1);
    ~eyeAnalyzer();
    // other declarations

private:
    Ort::Env env;
    Ort::SessionOptions session_options;
    Ort::MemoryInfo memory_info;

    Ort::Session detect_session;

    std::vector<const char*> detect_input_node_names;
    std::vector<const char*> detect_output_node_names;
    // other declarations
};
eyeAnalyzer::eyeAnalyzer(const std::string& detect_model_path, const int mode)
    : env(ORT_LOGGING_LEVEL_WARNING, "SmartDesktopPet"), session_options(), 			 memory_info(Ort::MemoryInfo::CreateCpu(OrtDeviceAllocator, OrtMemTypeCPU)), detect_session(env, detect_model_path.c_str(), session_options)
{
    // Enable CUDA (GPU) support
    Ort::ThrowOnError(OrtSessionOptionsAppendExecutionProvider_CUDA(session_options, 0));
    detect_input_node_names = {"images"};
    detect_output_node_names = {"output0"};
    // other initialization
}
Configure env
env(ORT_LOGGING_LEVEL_WARNING, "SmartDesktopPet")
Ort::Env is a class in ONNX Runtime used for initializing and managing the environment and global state of ONNX Runtime, including logging, thread pools, and other functionalities. Initializing the env object is essential to ensure that all features of ONNX Runtime work correctly. Subsequently, it is passed to the session through dependency injection.
Configure session_options
session_options()
detect_session(env, detect_model_path.c_str(), session_options)
Ort::SessionOptions is used to set various options. The most commonly used ones seem to be graph optimization acceleration, configuring CUDA, setting dynamic input and output, etc.
Ort::Session carries the model, and calling the run method can get the output from the input.
Configure memory allocation information
memory_info(Ort::MemoryInfo::CreateCpu(OrtDeviceAllocator, OrtMemTypeCPU))
Create an Ort::MemoryInfo object to describe the memory allocator and memory type information. This information is used in ONNX Runtime to manage memory allocation and usage.
Initialize input and output node names
Here you only need to use Netron to view the network. Of course, there is also a dynamic acquisition method, see the official documentation
other configurations
Ort::ThrowOnError(OrtSessionOptionsAppendExecutionProvider_CUDA(session_options, 0));
Configuring CUDA to accelerate model inference using GPU-0
Inference model
std::vector<cv::Rect> eyeAnalyzer::detect(const cv::Mat& image) {
    // Resize and preprocess the image
    cv::Mat image_resized, rgb_image;
    cv::resize(image, image_resized, cv::Size(640, 640));
    image_resized.convertTo(rgb_image, CV_32F, 1.0 / 255);
    // Create input tensor
    std::array<int64_t, 4> input_shape = {1, 3, 640, 640};
    size_t input_tensor_size = 1 * 3 * 640 * 640;

    std::size_t counter = 0;
    std::vector<float> input_tensor_values(input_tensor_size);
    for (int c = 0; c < rgb_image.channels(); ++c) {
        for (int h = 0; h < rgb_image.rows; ++h) {
            for (int w = 0; w < rgb_image.cols; ++w) {
                input_tensor_values[counter] = rgb_image.at<cv::Vec3f>(h, w)[c];
                counter++;
            }
        }
    }

    Ort::Value input_tensor = Ort::Value::CreateTensor<float>(memory_info, input_tensor_values.data(), input_tensor_size, input_shape.data(), input_shape.size());

    // Run the model
    auto output_tensors = detect_session.Run(Ort::RunOptions{ nullptr }, detect_input_node_names.data(), &input_tensor, 1, detect_output_node_names.data(), 1);

    // Process the output
    float* output_data = output_tensors.front().GetTensorMutableData<float>();
    // other codes
}
Get input tensor
One thing to note about onnxruntime is that incoming pointers should be of a data type that corresponds to the type used to create the tensor, and that consecutive space allocations should be used.
Ort::Value input_tensor = Ort::Value::CreateTensor<float>(memory_info, input_tensor_values.data(), input_tensor_size, input_shape.data(), input_shape.size());
Inference
pay attention to the tensor’s data type
Preprocessing output tensor
float* output_data = output_tensors.front().GetTensorMutableData<float>();
YOLOv8 Inference
Ultralytics YOLOv8 is a cutting-edge, state-of-the-art (SOTA) model that builds upon the success of previous YOLO versions and introduces new features and improvements to further boost performance and flexibility. YOLOv8 is designed to be fast, accurate, and easy to use, making it an excellent choice for a wide range of object detection and tracking, instance segmentation, image classification and pose estimation tasks.
This project is primarily deployment oriented and requires only a brief understanding of YOLOv8’s inputs and outputs
Get the pretrained models
Utilize the officially provided pretrained models, while also employing the API for model conversion provided by the official source.
from ultralytics import YOLO
# Load a model
model = YOLO("models/Detect/yolov8s.pt")  # load an official model
# Export the model
model.export(format="onnx")
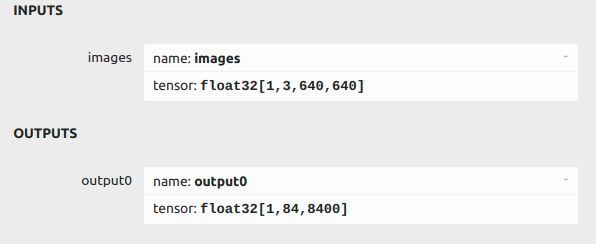
Watch: INPUTS’s name is ‘images’,Input is a resolution [3 x 640 x 640] image, OUTPUTS’s name is ‘output0’,output is the resolution [1×84×8400] data.
Normalize the input tensor
image_resized.convertTo(rgb_image, CV_32F, 1.0 / 255);
The output information is found in the official documentation for the centroid of 8400 detection frames, aspect data with 80 training categories under 8400 detection frames with confidence. Well, the insight is enough for this deployment.
Extraction and visualization
std::vector<cv::Rect> eyeAnalyzer::detect(const cv::Mat& image) {
    // output [1, 84, 8400] needs to transfer to[x, y, w, h, conf, class]
    size_t num_detections = 8400;

    for (size_t i = 0; i < num_detections; i++) {
        float conf = 0;
        int class_id = -1;
        for(int j = 4; j < 84; j++){
            if(conf <= output_data[j * num_detections + i]){
                conf = output_data[j * num_detections + i];
                class_id = static_cast<int>(j-4);
            }
        }
        if(conf < 0.4){
            continue;
        }
        float x = output_data[0 * num_detections + i];
        float y = output_data[1 * num_detections + i];
        float w = output_data[2 * num_detections + i];
        float h = output_data[3 * num_detections + i];
        int left = static_cast<int>(x - w / 2);
        int top = static_cast<int>(y - h / 2);
        int width = static_cast<int>(w);
        int height = static_cast<int>(h);

        results[class_id].push_back({ {left, top, width, height}, conf, class_id});
    }
    for (const auto& rect : vimg) {
        cv::rectangle(image_resized, rect, cv::Scalar(0, 255, 0), 2);
    }

    // show result
    cv::imshow("Detections", image_resized);
    cv::waitKey(0);

}
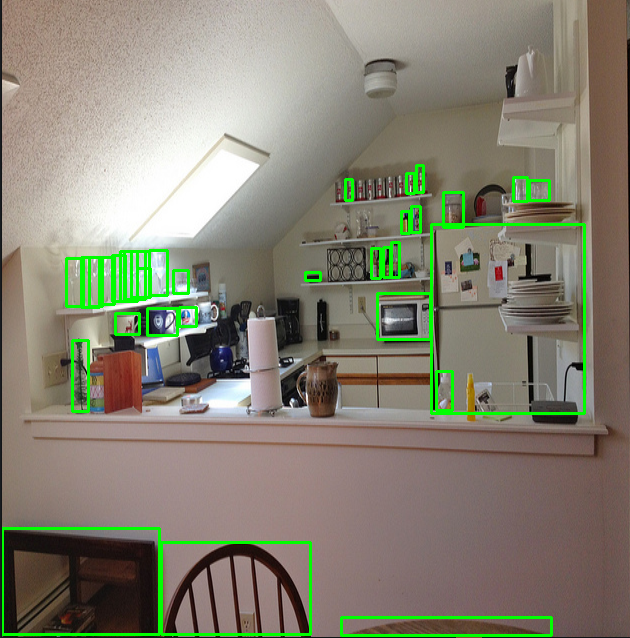
result
Reasoning was successful, but the problem was duplication of multiple detection frames, and the NMS module was added next to suppress the problem.

NMS module
“Non-Maximum Suppression (NMS) is a highly common algorithm in visual processing, which involves searching for local maximum values and suppressing non-maximum values. Interestingly, OpenCV has encapsulated this function since version 3.3, allowing direct invocation. However, unfortunately, the version on my machine is 3.2. Since it is a fundamental and widely used algorithm, I will proceed to implement it manually.
Using IoU as the standard
float eyeAnalyzer::IoU(const std::vector<int>& box1, const std::vector<int>& box2){
    int x1 = std::max(box1[0], box2[0]);
    int y1 = std::max(box1[1], box2[1]);
    int x2 = std::min(box1[0] + box1[2], box2[0] + box2[2]);
    int y2 = std::min(box1[1] + box1[3], box2[1] + box2[3]);

    float intersection_area = std::max(0, x2 - x1) * std::max(0, y2 - y1);
    int box1_area = box1[2] * box1[3];
    int box2_area = box2[2] * box2[3];

    float iou = intersection_area/(box1_area + box2_area - intersection_area);

    return iou;
}
Sorted by confidence
    for (auto& kv : results) {
        std::sort(kv.second.begin(), kv.second.end(), compareDetections);
    }

    // NMS
    for (auto& kv : results) {
        kv.second = nonMaximumSuppression(kv.second, 0.6);
    }
This part performs two-layer traversal by category, starting from the first detection box with the highest confidence. If the IoU of subsequent detection boxes is greater than the set threshold, the detection boxes are deleted, otherwise they are retained until the traversal is completed.
Analyse time complexity
For a class, the time complexity is O(nlog(n)) at best and O(n2) at worst.
std::vector<Detection> eyeAnalyzer::nonMaximumSuppression(const std::vector<Detection>& detections, float iou_threshold)
{
    std::vector<Detection> keepResults;
    std::vector<Detection> sorted_detections = detections;

    while (!sorted_detections.empty()) {
        Detection best_detection = sorted_detections.front();
        keepResults.push_back(best_detection);
        sorted_detections.erase(sorted_detections.begin());

        auto it = sorted_detections.begin();
        while (it != sorted_detections.end()) {
            if (IoU(best_detection.bbox, it->bbox) > iou_threshold) {
                it = sorted_detections.erase(it);
            }
            else {
                ++it;
            }
        }
    }

    return keepResults;
}
Test
The confidence level of the test setting is greater than 0.2, and the effect number can be seen. The basic deployment is completed.
The next step is to adjust the parameters, and if there is spare time, beautify the detection frame.